PGP Encryption and Decryption
PGP is a widely adopted encryption standard that ensures data confidentiality and integrity. By using PGP actions in the Event Manager, you can automatically encrypt or decrypt files immediately after upload. This supports secure, automated workflows for both sending and receiving files.
Common Use Cases
- Encrypting files for an external party: The external party generates a PGP key pair and shares their public key. SFTPGo is configured to automatically encrypt uploaded files using the public key. The trading partner downloads the files and decrypts them using their private key.
- Decrypting files from an external party: You share your public key with the external party and ask them to encrypt files before uploading. SFTPGo automatically decrypts the files after upload using your private key. The files are then available in plain form for further processing.
This setup ensures end-to-end file security with minimal manual intervention.
Key Requirements
PGP actions require either a password or a key pair. When using a key pair:
- For encryption, the public key is required. If a private key is also provided, it is used for signing.
- For decryption, the private key is required. If a public key is also provided, it is used for signature verification.
Example: Automatic Encryption After Upload
This example demonstrates how to configure an action to automatically encrypt files after upload.
Step 1: Create a PGP Encryption Action
From the WebAdmin, expand the Event Manager section, select Event actions and add a new action. Create an action named PGP encryption, set the type to Filesystem, the Filesystem action to PGP and paste the Public Key.
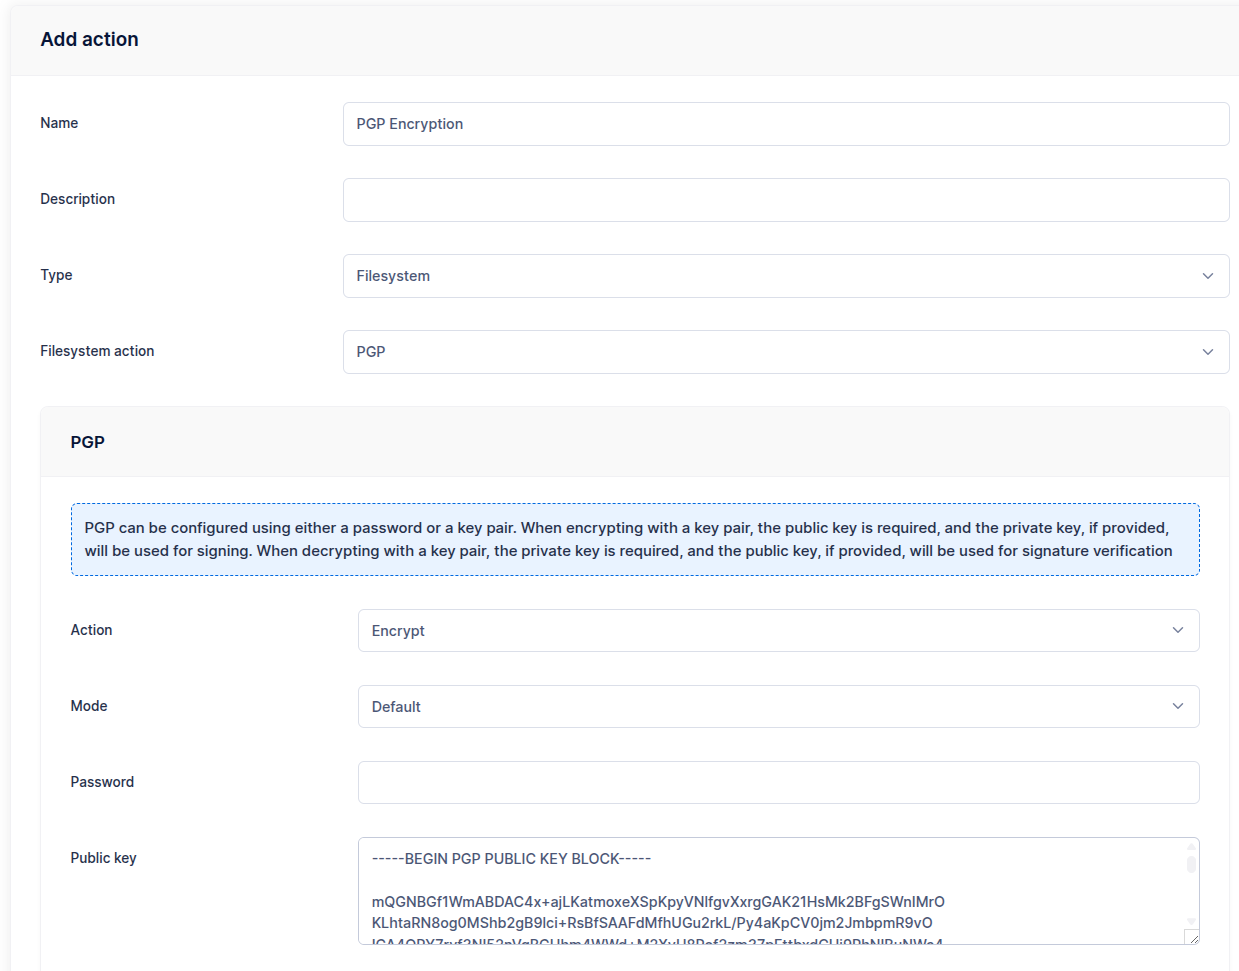
Configure the paths:
- Source path:
/{{.VirtualPath}} - Target path:
/{{.VirtualPath}}.pgp
For example, a file named file.txt will be encrypted and stored as file.txt.pgp.
A second common pattern is to write the encrypted output next to the source, letting SFTPGo derive the filename. To do this, use a directory target ending with /:
- Source path:
/{{.VirtualPath}} - Target path:
/{{ pathDir .VirtualPath }}/
Each matched file is written under the target directory with .pgp appended (/inbox/file.txt => /inbox/file.txt.pgp). The trailing / is required: without it, an upload like /inbox/file.txt would render the target to /inbox (a literal output filename).
Each path entry has its own After encrypt/decrypt option that controls what happens to the source file once it has been processed:
- Keep source (default) — the plaintext file is left in place.
- Delete source — the plaintext file is removed after a successful encrypt.
- Move source — the plaintext file is moved to a path you specify (placeholders supported).
Configuring this per entry avoids a separate Delete action when you only need to dispose of the original after encryption.

Step 2: Create an Upload Rule
Define a rule that executes this action after uploads. Select Filesystem events as trigger and upload as event.
Additional actions can be configured as part of the rule, such as sending an email notification on success.
Example: Automatic Decryption After Upload
This example shows how to automatically decrypt PGP-encrypted files upon upload, making the plaintext version available for further processing.
Step 1: Create a PGP Decryption Action
From the WebAdmin, create a new action named PGP decryption, set the type to Filesystem, the Filesystem action to PGP and select the Decrypt option. Paste the Private Key (and optionally the Public Key for signature verification).
Configure the paths:
- Source path:
/{{.VirtualPath}} - Target path:
/{{ stringTrimSuffix .VirtualPath (pathExt .VirtualPath) }}
For example, a file named report.csv.pgp will be decrypted and stored as report.csv. The pathExt helper extracts the file extension (.pgp) and stringTrimSuffix removes it. This approach works with any extension, not just .pgp.
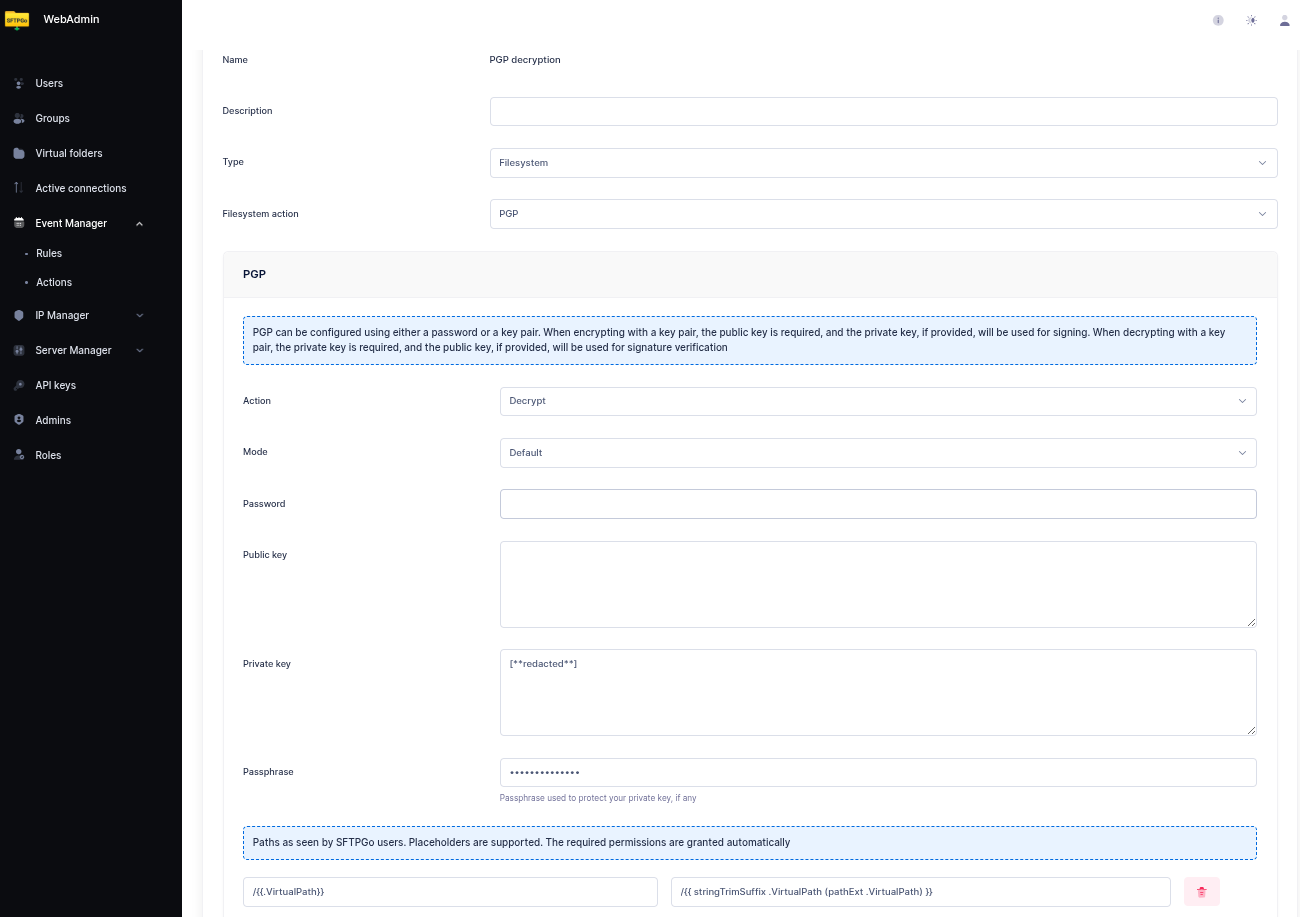
Step 2: Create an Upload Rule
Define a rule that executes this action after uploads. Select Filesystem events as trigger and upload as event.
You can add a path filter such as /inbox/*.pgp to run the action on encrypted files only. Patterns match the whole virtual path, so the directory is part of the pattern; ** matches across subdirectories, see Path filters.
To remove the original .pgp file after a successful decryption, set the entry's After encrypt/decrypt option to Delete source — there is no need for a separate Delete action.
Example: Scheduled Batch Encryption with Wildcards
When the same external party drops several files in a directory and you want to encrypt them all on a schedule, use a wildcard source and a directory target.
Step 1: Create a Batch PGP Encryption Action
Create a PGP action as in the first example, then configure the paths:
- Source path:
/inbox/*.csv - Target path:
/encrypted/
The trailing / on the target marks it as a destination directory: each matched file is written under it with .pgp appended (e.g., report.csv => /encrypted/report.csv.pgp). Subdirectories of /inbox/ are not descended into; zero matches is not an error.
For batch workflows it is common to set After encrypt to Move source with a directory like /processed so that already-encrypted files are not picked up by the next run.
Step 2: Schedule the Action
Create a rule with a Schedule trigger (for example, hourly) and select the batch encryption action.
If the inbox is reached through a virtual folder, assign that folder as Source folder and as Target folder on the action, so that it finds the files even though no user is logged in and runs once for the folder. A source folder requires a target folder: set both to the same folder to encrypt or decrypt in place, or write the output to a different one. The same per-entry disposition (Delete or Move) applies — typical setups archive originals to a dated path such as /processed/{{ .Timestamp.Format "2006-01-02" }}.